
Recently (as in a few months ago) I had a problem with my e-Bike where my battery wouldn't hold a charge, and wouldn't accept a charge from the charger.
Normally, when I plug my eBike's battery in, the charger's cooling fan whirls to life and one of the lights changes colour, indicating it's charging. This stopped happening!
I did a suite of tests, tried a few techniques recommended on forums and by the lead tech at Luna Cycle, and eventually confirmed my BMS was broken and needed to be replaced.
So in this guide I want to outline
- A bit about my bike (as background)
- How to test your BMS to confirm it needs replacing (or whether it's something else)
- Tests to do on a BMS and battery before you replace it
- Why a BMS might fail
- Where to get a BMS to replace it with — what to look for, and what to pay; and
- How to change the BMS over
About my electric bike
My electric bike is semi-custom. It is built like a custom, but by Luna Cycle in the USA. It has a Bafang (八方电气, "Eight Sides Electrical Appliances") motor with a 50A controller that Luna Cycle calls their "Ludicrous" controller, though I have it set to operate in 25A mode.

Because this was a crazy year, it ended up being stored fully charged, and allowed to fully deplete, while in storage. This isn't good for an eBike battery, it turns out, and so a few things needed to be done to get it back on the road.
The BMS — or Battery Management System — of a battery pack is the part that regulates both input (charging) and output (discharge) voltage and current from the cells.
Even though this might appear to be a guide for one kind of electric bike battery, it's generally applicable to all e-Bike batteries, and even batteries on other devices like scooters and mobility devices.
Why? Because many of these batteries are built with the same underlying technology — a pack of lithium 18650 cells.
How to test an electric bike's BMS/charging system
When the charging system of an electric bike fails, it means one of a few things:
- Supply failure: The charger might be broken (not delivering voltage or current necessary to charge)
- Mechanical failure: A connector wiring inside the battery might be broken,
- Cell failure: Some of the cells inside the battery may have failed, or
- BMS failure: The battery management system may not be operating
To get to the core of the problem, you have to test everything one by one.
The first (and easiest) thing to test is the charger. You measure the output voltage. For a 52V battery like mine, it should be supplying about 58V. For a 48V battery it should supply around 54V.
After you measure the output voltage, you do what's called the "light bulb test" — where you use an incandescent bulb hooked up to the outlet. This is easier in America (or Japan I guess) where the voltage supply is 110V, but it still works with 220V bulbs.
You could also test it with an automotive bulb if you have one. But it might blow!
Second, test for mechanical failures. Probe around with a multimeter and make sure you read operating voltage in the places where you should.
Also, open up your e-bike battery and check all the wires are intact, and that none of the solder joints have broken. Bikes get beaten up and it's possible — likely — that a joint will fail at some point, especially if your battery has gone flying across the road because you forget to lock it (guilty! Actually I lost the key for a while...)
Finally, you have to test the internals of the battery.
I did a suite of tests that Luna Cycle said I should do
- Opened it up and tested all the wires and connections
- Did a BMS battery reset
- Tested voltages across the pins — making sure every individual cell was operating correctly

One trick for testing voltage across the pins of the BMS is that they're often coated with silicon. You should scrape it away gently before checking the voltage.
How does the BMS of an e-Bike battery fail?
A BMS is a delicate issue. There are actually people who believe in charging batteries without a BMS, like this guy on YouTube:
He makes a lot of good points. Essentially, if you have a charger that can balance all the cells, you don't need to use a BMS for that purpose.
Firstly what does a BMS do?
The main role of the BMS in a e-bike's battery is to make sure all the cells of the battery are in balance during charging and discharging.
"Cells" of a battery pack are actually cell blocks, made up of multiple 18650 cells in parallel (to give additional current capacity). Each cell is thus the voltage of one battery, which is around 3.6V.
If a cell starts becoming over-depleted for some reason (an internal fault), the cell can get damaged further as current flows from another battery cell into that cell.
Many BMS also do temperature monitoring. Batteries deliver a lot of current while maintaining a constant voltage. There's a risk they can catch fire if they get too hot or if they get physically damaged. Temperature monitoring functions shut off batteries when they get too hot.
A battery BMS generally fails because
- A component gets overloaded — sometimes because too much current is drawn
- Bad soldering (not really a failure of the BMS)
- Broken connector
A common way in which a BMS can fail is one its over-current protections trips.
Most BMS have either a solid-state circuit breaker and/or a fuse. If too much current is drawn it'll trip.
The most common way in which a BMS over-current protector can trip is when they're charged from being completely flat. This can produce enough current to trip the breaker.
Another way is if a cell inside the battery fails. This can happen, but it's not common unless a) the cells are poor quality, or b) you've just had the battery for ages/many charge cycles.
If you're lucky, you can "reset" the circuit breaker on your BMS. See the next section. But if a component or a fuse has open-circuited permanently, you're S-O-L.
Before you replace the BMS of your eBike battery
As mentioned in the last section, if your battery has failed because of over-current protection, you might be able to rescue the BMS.
First, try "jumping" your battery's BMS.
Jumping the battery is sending a signal that triggers the BMS to reset.
Different batteries/BMS have different protocols for this, so consult the circuit diagram that came with your battery, or ask your battery vendor.
For Luna batteries, check the procedure below. It should apply to a lot of batteries as the BMS they use is quite common.

If "jumping" your BMS is unsucessful, you can do more extensive testing on your battery pack and on your BMS.
Watch the video below. The core of it is to check individual cell voltage (confirming they're in the 3.6-3.8V range), making sure no cell is dead. If it's dead, you can replace it, probably for about $15-20 of parts (and... a spot welder and some nickel strips).
If your BMS is fried, however, you have to buy one online and replace it.
Where to get a BMS online
The good news is that BMS are easy to get online and not expensive.
The bad news is that it can be a bit confusing which one to get!
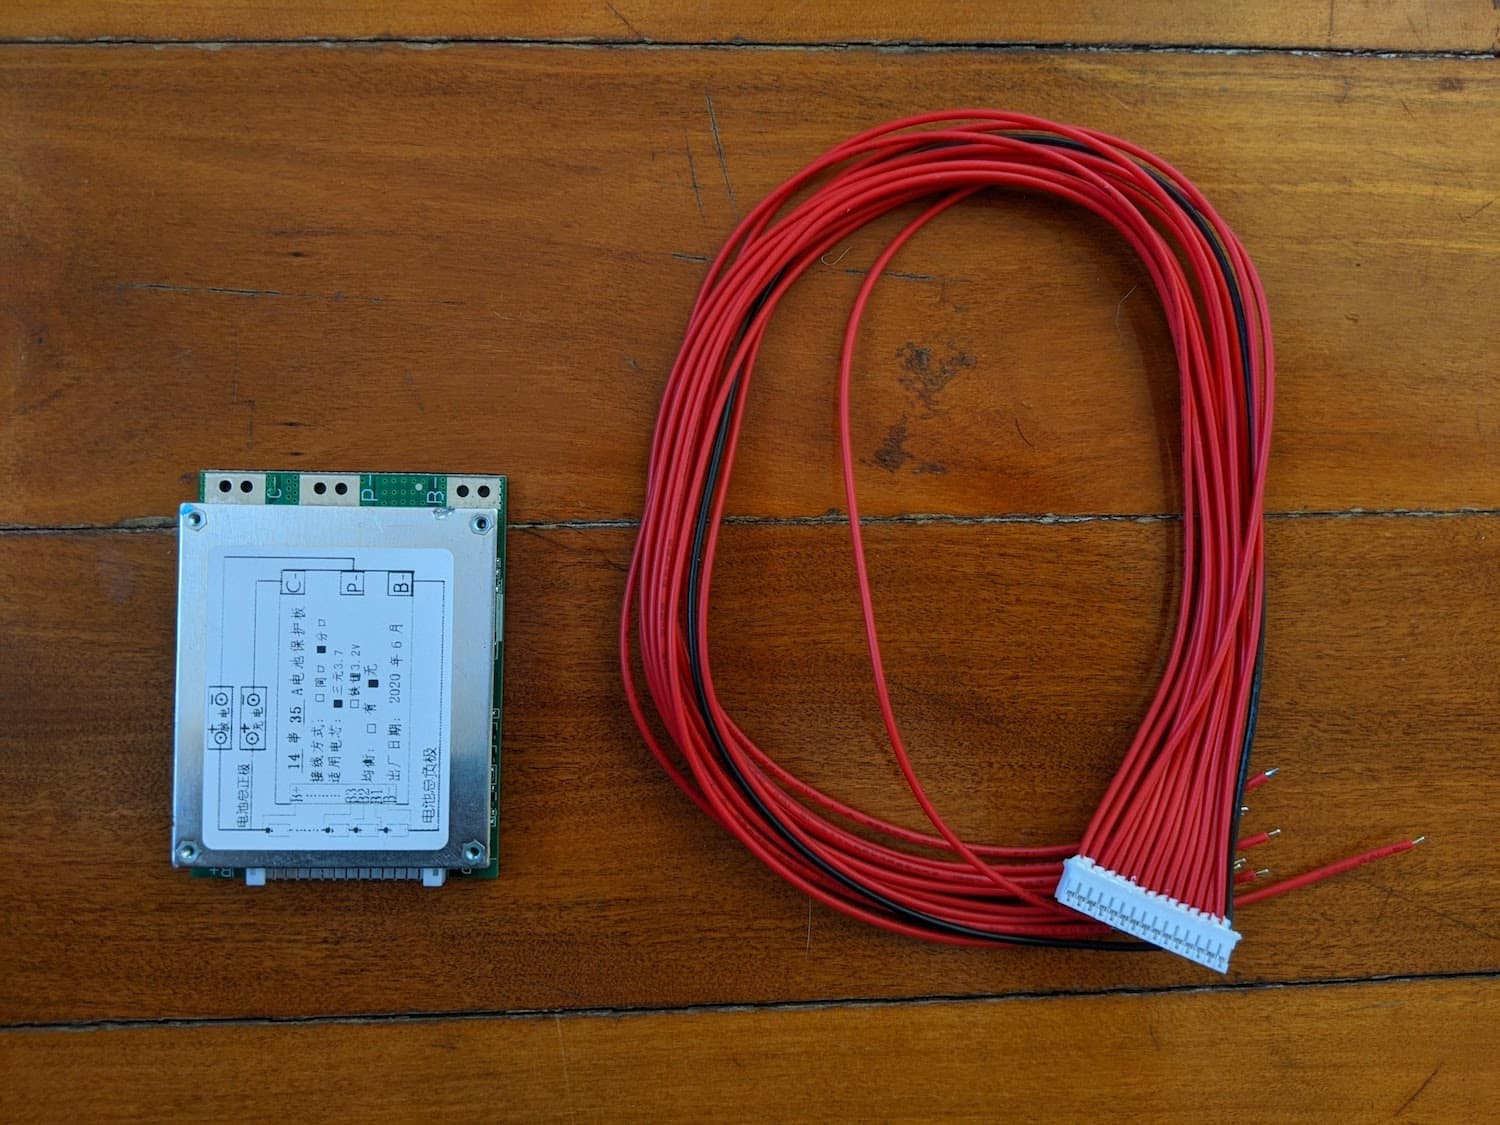
The most important part of a BMS is the size of battery pack it's rated for.
You might know you have one of the following battery pack sizes: 24V, 36V, 48V, or 52V. These are the most common battery pack sizes (36V seems to be the most common out of all of them).
The size of the battery pack dictates how many cells you have in the battery. Each cell is 3.6V. So a 36V battery pack translates to 10 cells in series.
If you have 10 cells in series and 3 in parallel, then this is referred to as a 10s3p pack. The 3p part isn't important here; what's important is that you need a 10s BMS.
So go on eBay and search for "10s BMS" (like in this search) and you'll get results like these:

Look at the number of pins and the style of connector at the top of the BMS.
It seems a lot of BMS manufacturers have an informal agreement as to what the connector should look like. This is good news!
The second rating to look for is the current rating. My bike is rated for 50A peak, so I found a controller that promised to get to that spec.
I would treat current ratings on eBay with a grain of salt. It's possible they might be truthful, but it's possible they're wildly exaggerating. Given they're so cheap, get the biggest spec one you can reasonably afford, assuming it'll be a weak point.

Installing the new BMS
There are three steps to installing the new BMS.
Firstly, remove the connector at the top. Mine is a 14-pin connector; you might have 10 or 12 pins or some other number. This should be a plug-and-play replacement for your current BMS.

Secondly, use a low-power soldering iron to de-solder the three connectors at the bottom.
Finally, use the soldering iron to connect the wires to your new BMS.
You should now be ready to power up and give your repaired battery a go. If you're lucky, like I was, then your charger will whirr to life and your battery will take a full charge.
Optional — I realised, as I was writing this, that there was a chance I could have destroyed the BMS again! The battery was discharged, and a surge might have fried it.
Luckily, this didn't happen. But you should consider perhaps directly recharging each cell of the battery pack if you have a 3.6V battery charger available.